

Browsing with multiple tabs open is a common experience, but it can quickly become overwhelming to manage and navigate through them, especially if they are related to different topics. The Tab Groups feature in Microsoft Edge Chromium provides a solution by allowing you to organize your tabs into groups. This feature makes it easier to manage your browsing sessions by categorizing tabs based on topics or projects, giving each group a distinct name and color.
Why Use Tab Groups?
- Improved Organization: Group related tabs together to keep your workspace tidy.
- Easier Navigation: Quickly find and switch between tabs in different groups.
- Reduce Clutter: Avoid opening multiple browser windows by categorizing tabs within the same window.
Steps to Use Tab Groups in Microsoft Edge Chromium
Step 1: Add a Tab to a New Group
- Right-click on the tab you want to add to a group.
- Select Add to new group from the context menu that appears.
.webp)
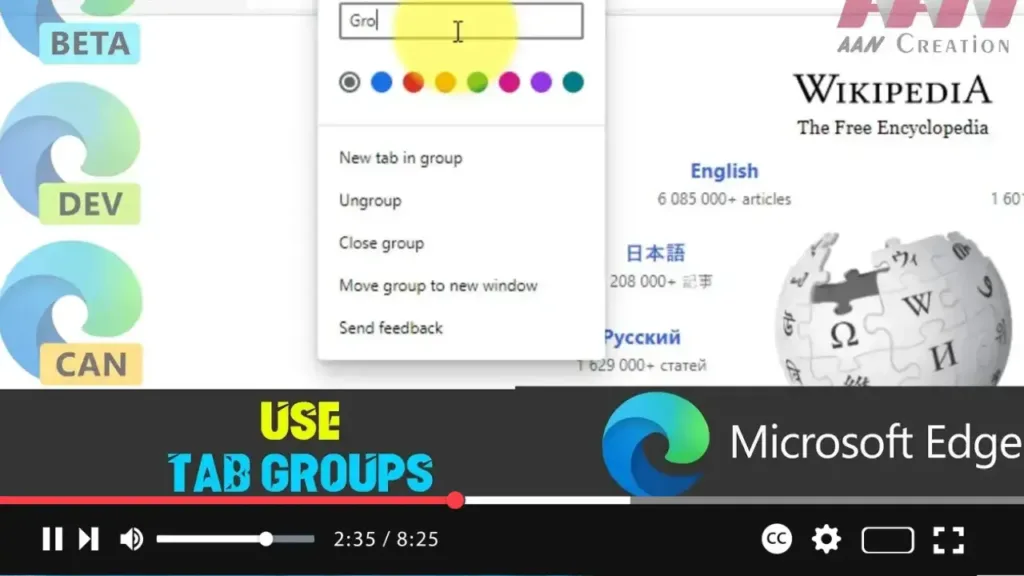
Step 2: Customize the Tab Group
- Once the tab is added to a group, a Group Indicator will appear next to the tab.
- Click on the Group Indicator (it may appear as a colored circle by default).
- A dialog box will open where you can:
- Name the Group: Enter a name that represents the group of tabs.
- Choose a Color: Select a color for the group to visually differentiate it from other tabs.
Step 3: Add Tabs to an Existing Group
- Right-click on a new tab that you want to add to an existing group.
- Choose Add to existing group from the context menu.
- Select the group you want to add the tab to.
.webp)
Step 4: Manage Tab Groups
- Ungroup Tabs: If you want to remove a tab from a group, right-click on the tab and select Remove from group.
- Close Group: To close all tabs in a group at once, right-click on the group’s indicator and select Close group.
- Rearrange Groups: Drag and drop tab groups within the tab bar to rearrange them according to your preference.
Step 5: Collapse and Expand Tab Groups
- Collapse Group: If you want to reduce clutter, you can collapse a tab group by clicking on its name or color indicator. This will hide the tabs within the group.
- Expand Group: Click on the group’s name or color indicator again to expand and view the tabs within the group.
Additional Tips
- Multi-Select Tabs: Hold the Ctrl key and click on multiple tabs to select them, then right-click and choose Add to new group to group them all at once.
- Persistent Groups: Tab groups persist across browser sessions, meaning you can close the browser and reopen it later with your groups intact.
- Managing Many Tabs: If you frequently work with numerous tabs, consider creating groups for different projects, tasks, or research topics to stay organized.
.webp)
By utilizing Tab Groups in Microsoft Edge Chromium, you can significantly improve your browsing efficiency, keep your workspace organized, and reduce the hassle of managing multiple open tabs.

