

Stopping Skype from Starting Automatically in Windows 10
As I said, Skype uses a lot more resources on a PC than it should. If you
want to keep Skype installed on your PC but just want to prevent it from
opening on startup, you can disable it easily via Task Manager. Here’s how
to do it:
want to keep Skype installed on your PC but just want to prevent it from
opening on startup, you can disable it easily via Task Manager. Here’s how
to do it:
01. Open up Task Manager app on Windows 10. You can either do a quick
search to launch it or right-click the menu bar located at the bottom of
your desktop and select “Task Manager”.
search to launch it or right-click the menu bar located at the bottom of
your desktop and select “Task Manager”.

(adsbygoogle = window.adsbygoogle || []).push({});
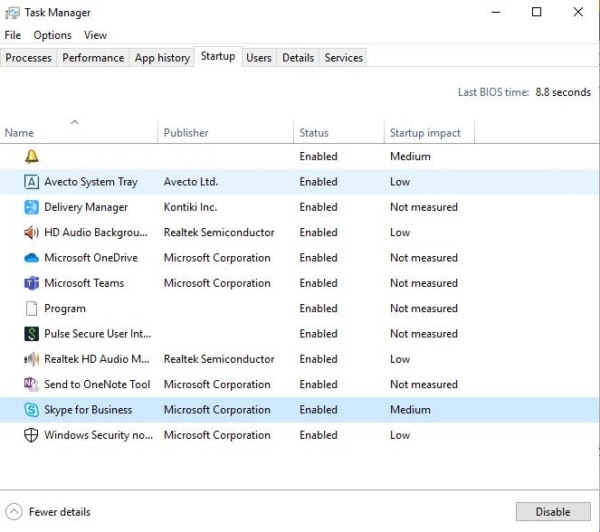
02. The default tab is “Process,” but in order to prevent Skype from
automatically starting, we must navigate to the “Startup” tab.
automatically starting, we must navigate to the “Startup” tab.
04. Click on the “Startup” tab, then scroll down until you see the Skype
icon. Click once to select that row, then right-click on the program and
hit “Disable”.
icon. Click once to select that row, then right-click on the program and
hit “Disable”.
That’s it. When you restart your computer, Skype will not automatically
launch.
launch.
Tip: Pay attention to those apps shown as “Enabled” under the Status
column. They could be pre-installed programs, similar to Skype. Disable
them if you don’t need them to run automatically.
column. They could be pre-installed programs, similar to Skype. Disable
them if you don’t need them to run automatically.
Bottom line: The fewer programs or services that are on that startup
list, the faster your PC will be.
list, the faster your PC will be.
You’ve now prevented Skype (or other apps) from starting automatically on
Windows 10. What if you want to completely uninstall Skype from your
computer? We’ll show you a few different approaches to completing the
task.
Windows 10. What if you want to completely uninstall Skype from your
computer? We’ll show you a few different approaches to completing the
task.
Method 1: Uninstall via Control Panel
Using the Control Panel is the easiest way to uninstall Skype or any
other apps. This way, you won’t accidentally delete shortcuts or other
programs such as Skype for Business. Additionally, it must be noted that
there is both a Desktop application and a Windows application for Skype.
You can download the Desktop version from the Skype website and install
the app from the Windows Store. We’ll cover how to uninstall both of
them.
01. Once Skype is closed completely, go to the left-hand side of the
Windows navigation bar and find the Control Panel by typing it into
Cortana’s search bar.
Windows navigation bar and find the Control Panel by typing it into
Cortana’s search bar.

02. Once the Control Panel is open, click on “Uninstall a Program” on
the bottom-left.
the bottom-left.
Windows will then uninstall Skype. You will receive a prompt once it is
done.
done.
Method 2: Uninstall Skype Directly
Alternatively, if you know where the Skype file is stored on your
PC, you can uninstall it directly from there. For most users, it’s
stored in the Programs folder. The file most of us see on our
Desktop is usually a Shortcut, not the actual file you want to
uninstall.
PC, you can uninstall it directly from there. For most users, it’s
stored in the Programs folder. The file most of us see on our
Desktop is usually a Shortcut, not the actual file you want to
uninstall.
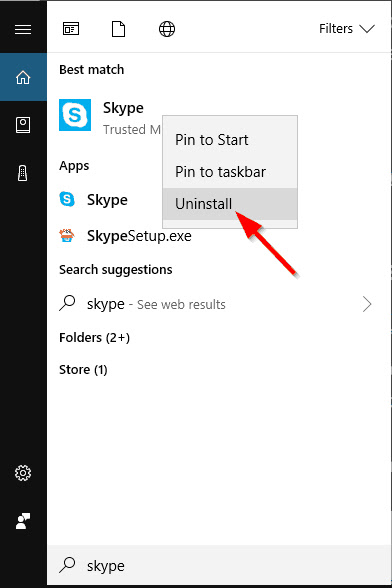
Simply type “Skype” in Cortana’s search bar on the bottom-left
corner. Once the application pops up, right-click, then hit
“Uninstall”. This method applies to the Skype app whether you
downloaded the installer file from Skype.com or from the Microsoft
Store.
corner. Once the application pops up, right-click, then hit
“Uninstall”. This method applies to the Skype app whether you
downloaded the installer file from Skype.com or from the Microsoft
Store.
Method 3: Uninstall through Settings
Type ‘programs’ in Cortana’s search box and click on the “Add or
remove programs” option.
remove programs” option.
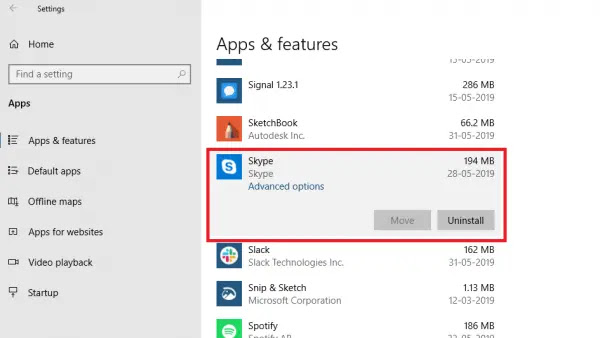
Once you open it up, click on Apps & Features and scroll down to
the Skype application. As you see from the screenshot below, both
versions appear on my computer. Click on one of them and hit the
Uninstall button. Then do the same with the other once the first is
done.
the Skype application. As you see from the screenshot below, both
versions appear on my computer. Click on one of them and hit the
Uninstall button. Then do the same with the other once the first is
done.
Removing Residual Files Associated with Skype
Although you’ve uninstalled the Skype app, it’s very likely that
some residual files related to Skype are still stored on your PC
taking up unnecessary space. To find and delete them, press the
“Windows + R” keys and type in “%appdata%” in the dialog box that
appears. Note: the Windows button is between ALT and FN on most PCs.
some residual files related to Skype are still stored on your PC
taking up unnecessary space. To find and delete them, press the
“Windows + R” keys and type in “%appdata%” in the dialog box that
appears. Note: the Windows button is between ALT and FN on most PCs.
Once you click “OK” or hit the Enter key, the following window
should appear in Windows Explorer:
should appear in Windows Explorer:
Scroll down to Skype and right-click to delete it. Please keep in
mind that this will also delete your chat history. If you want to
save your history, open the folder and look for the file containing
your Skype username. That file should be copied and pasted somewhere
else.
mind that this will also delete your chat history. If you want to
save your history, open the folder and look for the file containing
your Skype username. That file should be copied and pasted somewhere
else.
The last step is to clean out entries in your registry. Press the
“Windows + R” combination keys again. Type “regedit” and hit enter.
“Windows + R” combination keys again. Type “regedit” and hit enter.
The following file should pop up: Select Edit and then Find.
Type in Skype. You’ll see up to 50 entries appear. Right-click and
delete each one individually.
delete each one individually.
NOTE: You should be extremely cautious when modifying your registry
as serious problems could arise. It is always a good idea to back up
the registry in Windows 10 before changing the registry.
as serious problems could arise. It is always a good idea to back up
the registry in Windows 10 before changing the registry.

