

The Delete Confirmation Dialog box feature is disabled by default in
Windows 10. If the user accidentally selects the delete option or
presses the delete button, the file or folder will be moved to the
Recycle Bin.
Windows 10. If the user accidentally selects the delete option or
presses the delete button, the file or folder will be moved to the
Recycle Bin.
If the “Do not move to the Recycle Bin” feature is enabled in the
system then the system will permanently delete all the selected files
and folders without sending them to the Recycle Bin, because the Delete
Confirmation Dialog box feature is disabled in your system. As a result,
you must enable the “Delete Confirmation Dialog” box feature in your
system.
system then the system will permanently delete all the selected files
and folders without sending them to the Recycle Bin, because the Delete
Confirmation Dialog box feature is disabled in your system. As a result,
you must enable the “Delete Confirmation Dialog” box feature in your
system.
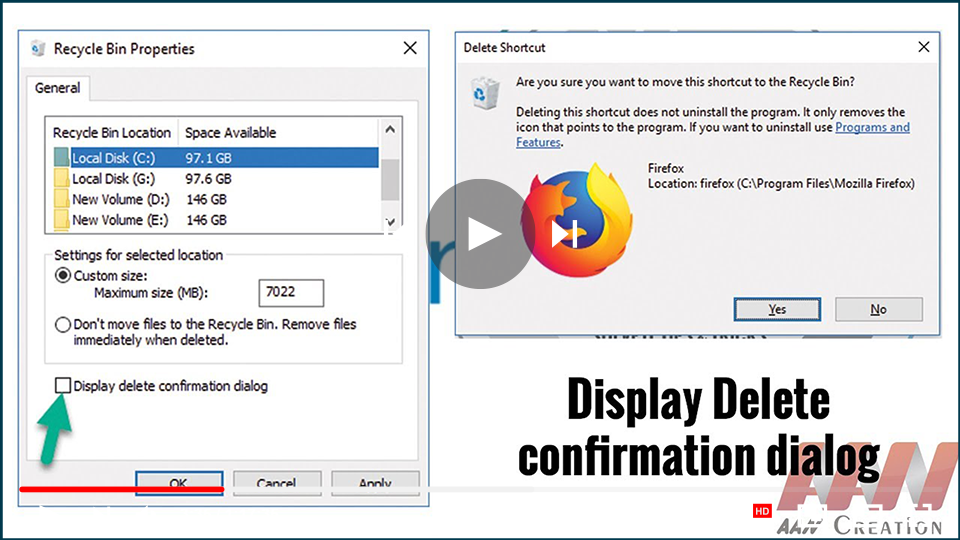
When a user deletes a file or folder after enabling this feature, a
confirmation dialog appears on the screen with the message “Are you sure
you want to move this file/folder/shortcut to the Recycle Bin?”
confirmation dialog appears on the screen with the message “Are you sure
you want to move this file/folder/shortcut to the Recycle Bin?”
This tutorial will show you various ways, how to enable the delete
confirmation dialog box in Windows 10.
confirmation dialog box in Windows 10.
Via Recycle Bin Properties
The user can easily enable the delete confirmation by using the
Recycle Bin Properties option. dialog box option. To proceed, follow
the steps.
Recycle Bin Properties option. dialog box option. To proceed, follow
the steps.
01. Navigate to the “Recycle Bin” folder on the desktop.
02. Right-click on the Recycle Bin folder and select “Properties.”

(adsbygoogle = window.adsbygoogle || []).push({});
03. Right-click on it and click on the “Properties” option.

04. To proceed, click (select) the “Display delete confirmation
dialog” option and then click the “Apply” button.
dialog” option and then click the “Apply” button.

When you delete a file or folder, the delete confirmation dialog
appears on the screen.
appears on the screen.
Using the Registry Editor
The delete confirmation dialog box can also be enabled using the
registry editor. Follow the below instructions.
registry editor. Follow the below instructions.
01. Open the Run dialog box from the Start menu, or press “Window
+ R” to open the RUN window.
+ R” to open the RUN window.
02. Type “regedit.exe” & Press enter key to open the
“Registry Editor”.
“Registry Editor”.
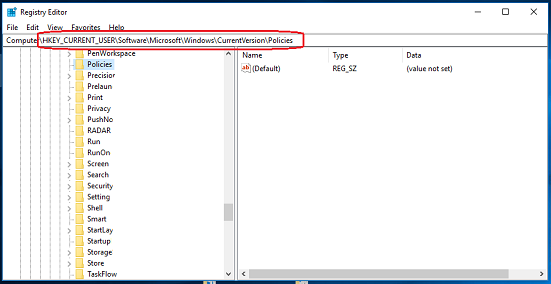
03. Navigate the following path:
HKEY_CURRENT_USERSoftwareMicrosoftWindowsCurrentVersionPolicies.
(adsbygoogle = window.adsbygoogle || []).push({});
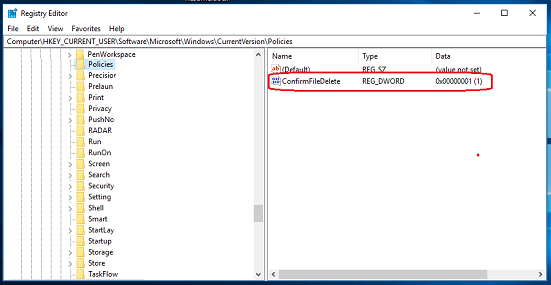
04. Right-click on the blank area on the right and select New
DWORD.
DWORD.
05. Give the new DWORD a name now. & set its “value data” to
1 by double-clicking on it.
1 by double-clicking on it.
06. To see the changes, restart your system or sign out and back
in.
in.

