

If your Windows 10 device has multiple GPUs, you have the option to specify which graphics processor an application should use. This feature is particularly useful for optimizing either performance or battery life, depending on your needs. Although traditional methods to set the preferred GPU involved using the control panels of Nvidia or AMD, Windows 10 has integrated this capability directly into the system settings starting from version 1803 (April 2018 Update).
Here’s how to set the default GPU for your applications:
Step 01: Open Settings
Begin by opening the Settings app on your Windows 10 device. You can do this by clicking the Start button and selecting the gear icon, or by pressing Windows + I on your keyboard.
Step 02: Click on System
In the Settings window, click on System to access display, sound, notifications, and power settings.
.webp)
Step 03: Click on Display
Under the System settings, click on Display from the menu on the left side. This section manages display-related settings.
Step 04: Access Advanced Graphics Settings
Scroll down to the Multiple displays section and click on Graphics settings or Advanced graphics settings. This will take you to a page where you can specify the preferred GPU for individual apps.
Step 05: Select App Type
You’ll now see a drop-down menu labeled Choose an app to set preference. This menu allows you to select the type of app you want to configure:
- Classic app: These are traditional Win32 desktop programs that you typically download and install from the web.
- Universal app: These are apps downloaded from the Microsoft Store.
Step 06: Add the App
If you select Classic app, click the Browse button to locate the application’s executable file (.exe) on your computer. If you choose Universal app, you can select the app from a drop-down menu.
.webp)
Step 07: Choose the App
After adding the app, it will appear in the list. Select the app from the list to proceed with configuring its GPU preference.
Step 08: Click the Options Button
Once the app is selected, click on Options to open the graphics preference settings for that application.
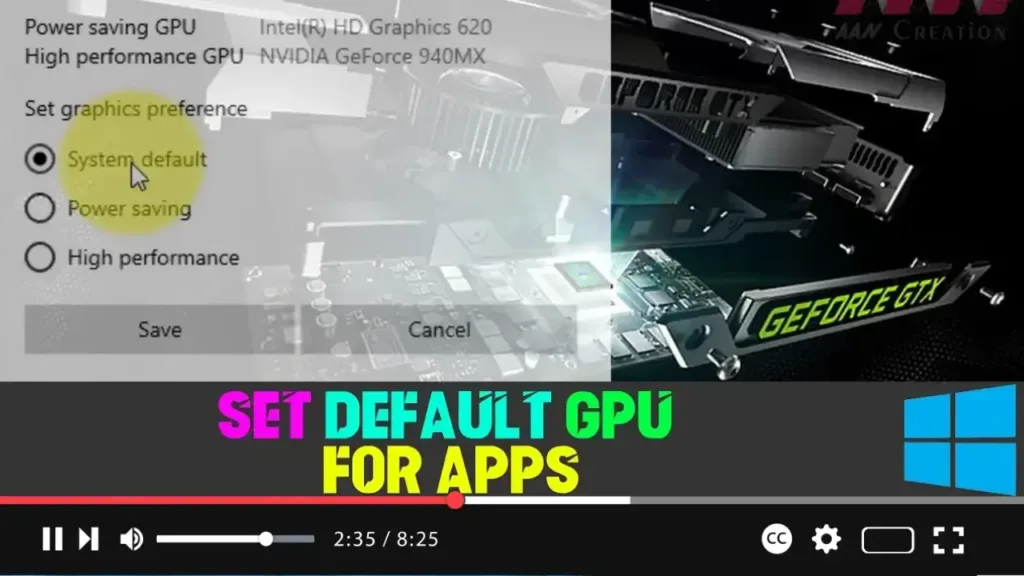
Step 09: Set Graphics Preference
In the Graphics preference window, you have three options:
- System default: Windows 10 will automatically select which GPU to use based on the application and system load.
- Power saving: This option runs the application on the integrated graphics processor, which consumes less power.
- High performance: This option runs the application on the discrete or external GPU, which provides better performance but consumes more power.
Step 10: Save the Settings
After selecting your preferred option, click the Save button.
.webp)
Conclusion
Once you’ve completed these steps, the selected application will use the specified GPU the next time it runs. By using this method, you can tailor the performance of your Windows 10 device to suit your needs, whether you’re looking to maximize battery life on a laptop or achieve the best performance on a desktop with a powerful discrete GPU.
External Details
-
Understanding GPUs:
A GPU (Graphics Processing Unit) is a specialized processor designed to accelerate rendering images, animations, and videos. Devices with multiple GPUs typically have an integrated GPU, which is energy-efficient and used for less demanding tasks, and a discrete GPU, which offers higher performance for tasks like gaming or video editing. -
Why Set a Default GPU:
Setting a default GPU allows you to optimize your system’s performance based on the specific needs of your applications. For instance, graphic-intensive applications like video editing software or games benefit from being assigned to the high-performance GPU. Conversely, less demanding applications can be assigned to the integrated GPU to save power, especially useful on laptops. -
Considerations for Gamers:
Gamers, in particular, can benefit from setting the high-performance GPU as the default for their games to ensure the best possible gaming experience. However, this might come at the cost of increased power consumption and heat generation. -
Power Saving Mode:
The Power saving option is ideal for applications that don’t require high graphical power, such as web browsers, office applications, and video streaming apps. This setting helps extend battery life on laptops by utilizing the more energy-efficient integrated GPU. -
System Default:
Choosing the System default option lets Windows 10 decide which GPU to use for each application. This setting is suitable for users who are not sure which GPU to select, as Windows will typically optimize based on the application’s requirements and system configuration.
By following this guide, you can enhance the performance and efficiency of your Windows 10 device, ensuring that your applications run on the most appropriate GPU. Whether you’re aiming for better battery life or maximum performance, these settings allow for a more customized computing experience.

