

If you prefer a larger Start Menu experience in Windows 10, this guide will show you how to enable a full-screen Start Menu on your desktop. This feature can enhance usability, especially for touch devices, and allows for better organization and accessibility of your apps and programs.
Step 01: Open Settings
Begin by clicking on the Start button and typing “Settings” in the taskbar search box. Select the Settings application from the search results.
Step 02: Access Personalization
Within the Settings window, click on Personalization to access various customization options for your Windows interface.
Step 03: Configure Start Settings
In the Personalization menu, select Start from the list on the left side. This will lead you to settings specifically for the Start Menu.
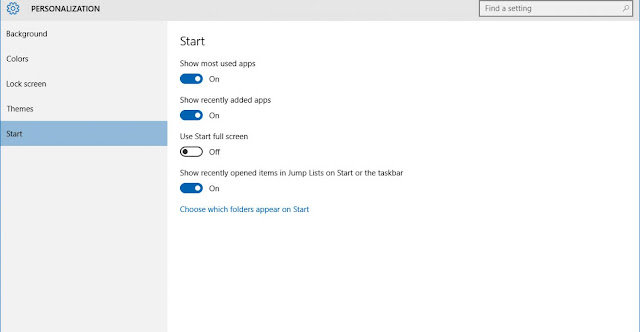
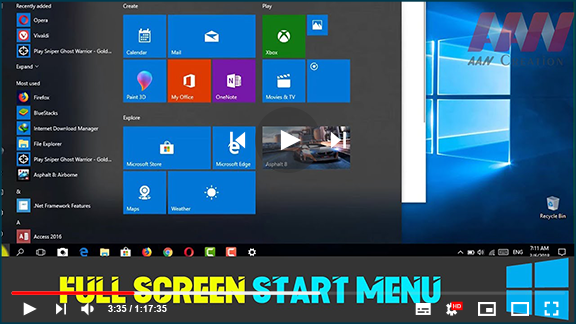
Step 04: Enable Full-Screen Mode
Look for the option labeled “Use Start full screen” and toggle it to On. This setting allows the Start Menu to occupy the entire screen when you open it.
The next time you access the Start Menu, it will now appear in full-screen mode, providing a more immersive and organized view of your applications. You can choose to view all apps for a complete list or stick to your pinned tiles for quick access to frequently used programs.
Resizing the Start Menu
If you wish to resize the Start Menu without enabling full-screen mode, simply hover over the edges of the Start Menu. You can drag the top or side borders to adjust its height and width to your liking.
By utilizing the full-screen Start Menu, you can optimize your workflow and make the most of your Windows 10 experience. Whether you’re using a standard monitor or a touch-enabled device, this feature enhances navigation and accessibility, making it easier to find and launch your favorite applications.
(adsbygoogle = window.adsbygoogle || []).push({});

