


The Snipping Tool is a built-in screenshot utility in Microsoft Windows that allows users to capture images of their screen easily. Although it has been largely replaced by Snip & Sketch in newer updates, the Snipping Tool remains accessible and useful, particularly for its unique features, such as the “Delay” function. This feature enables users to capture screenshots of context menus or other transient elements that require a little time to appear. Below is a detailed guide on how to use the Snipping Tool to capture screenshots in Windows 10.
Step-by-Step Guide to Using Snipping Tool
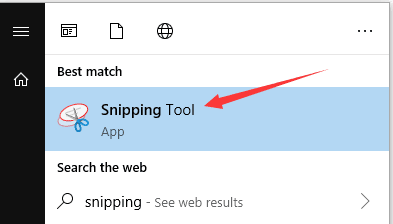
Step 01: Open the Snipping Tool
-
Search for Snipping Tool: Click on the Windows search bar located at the bottom left of your screen. Type “Snipping Tool” and press Enter.
-
Launch the Application: Click on the Snipping Tool application from the search results to open it.
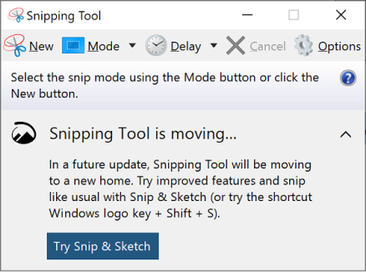
Step 02: Explore the Tool Options
Once the Snipping Tool is open, you’ll see several options for capturing screenshots:
- New: This button allows you to start a new snip. Click this to select the type of snip you want to create.
- Mode: Click on the Mode dropdown menu to choose the type of snip you want:
- Free-form Snip: Draw any shape around the object you want to capture.
- Rectangular Snip: Drag the cursor around an object to form a rectangle and capture it.
- Window Snip: Select a specific window to capture.
- Full-screen Snip: Capture the entire screen.
Step 03: Use the Delay Function (Optional)
To capture elements that require time to appear, such as context menus or selection handles, you can use the Delay function:
- Click on the arrow next to the New button.
- Select the Delay option (choose a delay time between 1 to 5 seconds).
- After setting the delay, click New. The Snipping Tool will wait for the specified time before allowing you to create a snip.
Step 04: Capture Your Screenshot
- If you selected the Delay option, open the context menu or highlight the object you want to capture. The Snipping Tool will automatically activate after the delay period.
- Use your mouse to draw around the area you want to capture, or select the appropriate snip mode as described earlier.
- Once you have selected the area, release the mouse button to capture the screenshot.
(adsbygoogle = window.adsbygoogle || []).push({});
Step 05: Save or Share the Screenshot
After capturing your screenshot, it will open in the Snipping Tool interface:
- Edit (if necessary): You can use the tools in the Snipping Tool to annotate or highlight parts of the screenshot.
- Save the Screenshot: Click on File in the top menu and select Save As. Choose a location, enter a file name, and select the file format (PNG, JPEG, etc.) to save your screenshot.
- Share Directly: You can also copy the screenshot to your clipboard by clicking the Copy button, allowing you to paste it directly into another application.
Conclusion
The Snipping Tool in Windows 10 is a valuable utility for capturing screenshots, especially with its Delay function that allows you to capture dynamic elements. By following these steps, you can easily take screenshots and save or share them as needed, enhancing your productivity and communication capabilities. Although Snip & Sketch is the recommended tool for newer updates, Snipping Tool remains a reliable option for users who prefer its straightforward functionality.

